


PRICING – SUPERDRAIN 5200
- SuperDrain 7’11” x 65’6″ (518 sq. ft.) / 2.4m x 20m $486.92
- Membrane Cap Molding (Bundle of 40 ft)$21.95
- SuperPlug (Bag of 50)$15.59
- Small Plug (Bag of 100)$11.02
SHIPPING
Standard Shipping: 3 – 7 Business Days
All shipping times are estimated and may not be 100% accurate. Shipping times may vary based on location and order size. Most orders are shipped within the next business day.
Landscaping Soils
Under landscaping soils on top of concrete patio decks. The geo-textile layer allows for the water from sprinkling systems not to over load the soil by way of the drainage core.
Retaining walls
Are subject to cracks from wet soil load pressure and may require a drainage mat that removes this water in the soil. By using a SUPERDRAIN membrane, you can mitigate cracks that come from not installing the membrane. When you need a durable long lasting drainage membrane, SUPERDRAIN membranes are your best choice. They are made from extra tough, long lasting high-density plastic.
INSTALLATION:
Materials and tools will vary depending on your application and the type of foundation.
EXTERIOR APPLICATION:
The keys to a good installation
- Install to final grade height.
- Incorporate into the drain system at the footing.
- It is better if the membrane is installed prior to installing perforated pipe and the drainstone.
- Ensure you have enough membrane, plugs, and molding strips to complete the area that you are protecting.
- Follow the Installation instructions.
Addition coating(s) on the wall is not required but provides additional protection. Consult with local building official if one is involved, as they determine what they will accept. This can vary from one city to the next.
PREPARATION
- Ensure the site is safe and accessible.
- Make sure that you have all the tools and material necessary to complete the job.
- Determine the roll heights required and measure the length needed.
- Determine the final grade height and snap chalk lines. The product should not be exposed to UV for long periods of time.
- Clean the footing off and repair any imperfections.
- Use a suitable mastic or tar for patching tie holes, honeycombing, protrusions, etc. This can be found in the roofing or foundation section at most local lumber yards and Hardware stores. (Recognized as foundation mastic, roof patch, and plastic cement). The most cost effective is tar based and black in color. It is available in 1 and 5 gallon pails and also in caulking gun tubes. SUPERSEAL is chemical resistant and compatible with all these types of products.
There are 3 steps to the installation – Do not try to do all three steps as you go. It is much easier and quicker to do it in 3 stages
- Hanging / Plugging / Molding
1. HANGING THE MEMBRANE
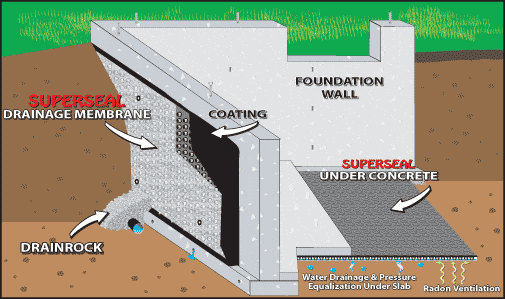
Once you have your wall prepped, start by holding the membrane at the chalk line with the dimples go towards the wall and install a SuperPlug about 8-12 inches down. Move down the wall approx. 8-10 feet and install another SuperPlug. Continue this process until all the membrane is hanging on the wall. If you have extra material at the bottom. It is flexible enough that it makes a nice 90 degree bend where the wall meets the footing. The membrane can sit directly on top of the footing or extend out to the edge of the footing. Ensure that you have a minimum of 6 inches of drainstone around the drainpipe, on the footing and up the membrane at the bottom.
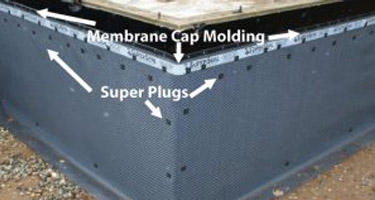
When you come to an inside or outside corner you can put a slice in the membrane at the bottom to allow the rest of the roll to wrap the corner without cutting the whole roll vertically. Put a SuperPlug 4-6 inches in from each corner, every 2 feet vertically.
OVERLAPS AND SEAMS
Anytime you have an overlap vertically or horizontally it is a minimum of 6 inches. You will find that the dimples nest together like an egg crate. It is good practice to run a bead of the black mastic within the overlap but is not mandatory. Overlaps in sloping areas should be done overlapping the higher piece over the lower piece. This will prevent migrating water to enter the seam. (just like a roof shingle)
WINDOW WELLS
Windows are the # 1 cause of water penetration. Concrete cracks at the weakest point and that is almost always at the bottom of a window opening. If you have any windows that are lower than grade height and require a window well, cut and cap the membrane as close the bottom of the window as possible. Cut and cap the sides vertically so it will end up to be just inside the window well opening on each side. (HINT: you can cap it later when you do the rest of the molding or cap)
After you have hung all the member, go back to where you started and start step 2 – plugging
2. PLUGGING THE MEMBRANE
- At the top is where you follow the specific pattern that repeats over and over.The basic pattern is; Put a plug 8 inches down from the top and install a row of SuperPlugs every 16 inches horizontally. Then 8 inches down for that row of plugs install another row of plugs every 16 inches in between the plugs above. This creates a W pattern . (See detailed instructions for more details)
- In the middle and the bottom, you only have to put plugs every 6-10 feet horizontally. Enough to keep the membrane tight against the wall. Try to get the bottom plugs as close to the footing as possible to prevent the membrane from moving around while the drain work and backfilling is being done.
- Plugs are installed every 2 feet vertically on all overlaps.
- Plugs are installed every 2 feet vertically and 4-6 inches in from corners. (inside and outside corners)
- After all the plugs are in, go back to where you started and start step 3 – Molding/Capping.
3. MOLDING or CAPPING
Molding must be installed on all open edges using the Membrane Cap.
Membrane Cap is a piece of plastic 4 feet long and only 1 ½ inches wide that seals all open edges. It is L shaped and smooth on the back. It can be installed horizontally, vertically, and on any angle. You can use the Membrane Cap throughout your entire job.
Membrane Cap is a bundle with 10 pieces that are 4 feet long equaling 40 linear feet. It is fastened every 6-8 inches butting each piece together as you go. IT can be cut with a standard utility knife. It is not necessary to overlap it.
Once the molding has been installed, it is good practice to walk around and patch any open spots.
FASTENING SYSTEMS
STANDARD FASTENING SYSTEM
(Most economical material cost system)
Requires Membrane Cap for all edges and Super Plug fastened 8″ OC. Small Plugs can be used to fasten corners and overlaps.
1 roll of membrane requires approximately:
- 2 bundles of Membrane Caps
- SuperPlugs: 3 bags per roll
[/collg][/row]
SuperPlugs
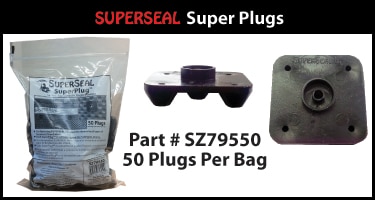
Each plug has 5 dimples that interlock into the membrane providing superior holding strength over a single plug. Recommended for all areas.
Membrane Cap
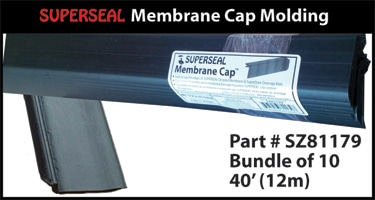
Smooth L shaped molding that caps the membrane – 40 feet per bundle.
TOOL REQUIRED
CONCRETE NAIL GUN – For poured walls
The following guns work very well with the system as they hold 40 nails and the installation is quick. The nose piece friction fits the SuperPlug and Small Plug perfectly without any fancy adapters.
HILTI GX 120 https://www.hilti.ca/direct-fastening/electrical-%26-mechanical-fastenings/r3697
HILTI G3 https://www.hilti.ca/direct-fastening/drywall-applications/3538128
Ramset Trakfast http://www.ramset.ca/product/47/trakfast-gas-powered-tool
TAPCON – Poured and Block wall Foundations
You can also use 1 ¼ inches Tapcon screws ( 1 ¼ inches x 3/16 inches hexagon head is best). This is a pre-drill system. This is more time consuming than a nail gun but works well if it you are doing a small job or it’s a onetime use. TAPCON https://www.tapcon.com/products/concrete-screw-anchors
CONCRETE NAILS – Hand nailing
It is possible to use standard concrete nails and a hammer. Concrete varies in hardness in different regions. This method is labor intensive and time consuming. This is usually only done when the concrete is freshly poured and is in the curing process. Test a spot first before continuing.
DECK SCREWS
Standard deck screws are used on ICF and Wood foundations only
Other tools you may need:
Eye protection, Ear protection, gloves, hammer, Tool belt, tape measure, marker, chalk line, utility knife, ladder, caulking gun or putty knife
20 year product warranty
|
||||||||||||||||||||||
What is the compressive strength of the membrane?
It is 5200 pounds per square foot. (250 kN/m²)